As you know, Apache Spark can make use of different engines to manage resources for drivers and executors, engines like Hadoop YARN or Spark’s own master mode.
For a few releases now Spark can also use Kubernetes (k8s) as cluster manager, as documented here.
Documentation is pretty accurate, but at least when I first tested this, with Spark 2.4.0, I did stumble upon a few gotcha’s, especially with regards to the role-based access control (RBAC) of the k8s cluster. So all of the below applies to 2.4.0; newer versions might offer simplified setups and configuration, especially around BDAP k8s authentication.
In this little elaboration we explicitly refer to Azure Kubernetes Services (AKS) for the infrastructure. It turns out that other clouds, such as Google Cloud Platform, have more specific support, with projects such as Kubernetes Operator.
Infrastructure
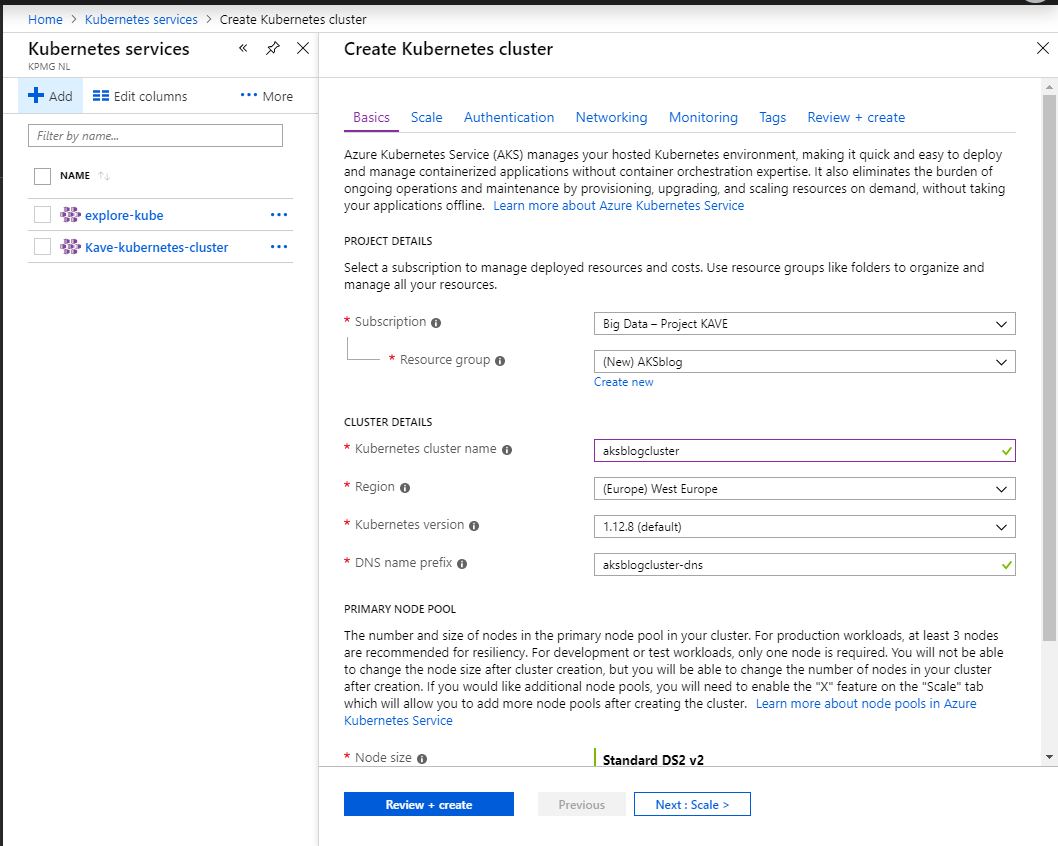
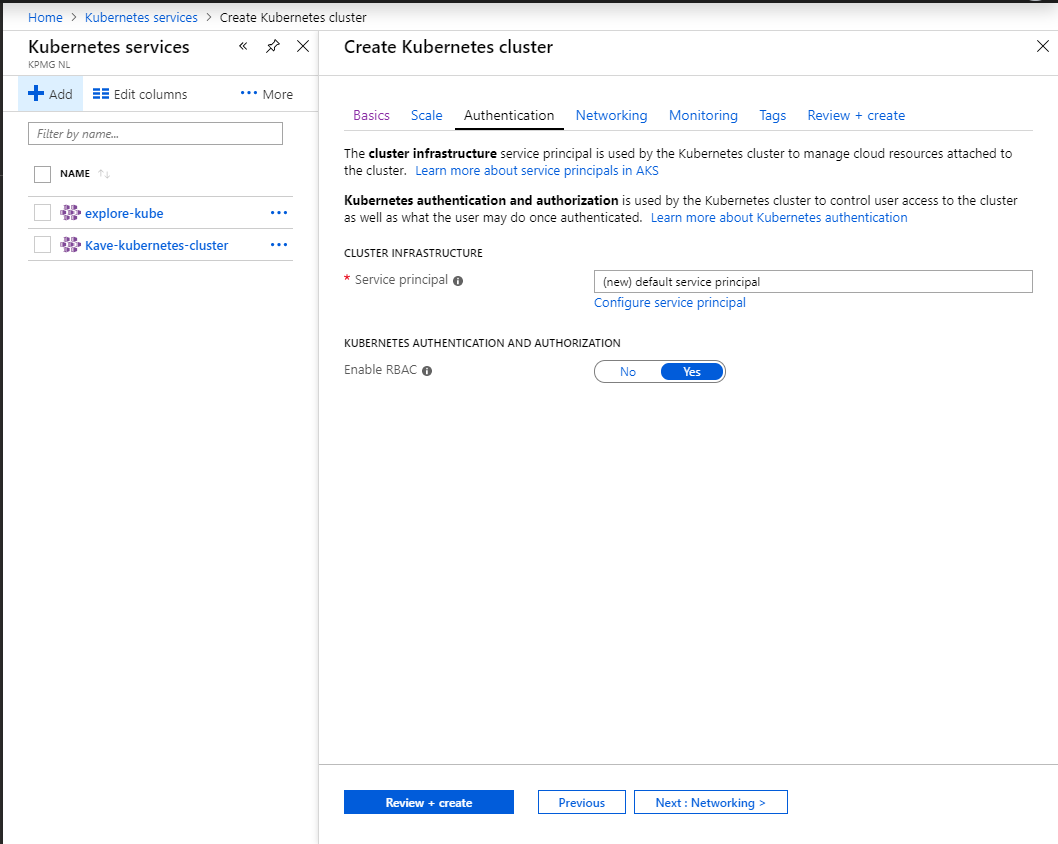
To get started, create an AKS cluster in your subscription of choice, but be careful to set RBAC mode on: it cannot be turned on at runtime! A few important points:
k8s version should be 1.6 at least, the AKS default version should do it
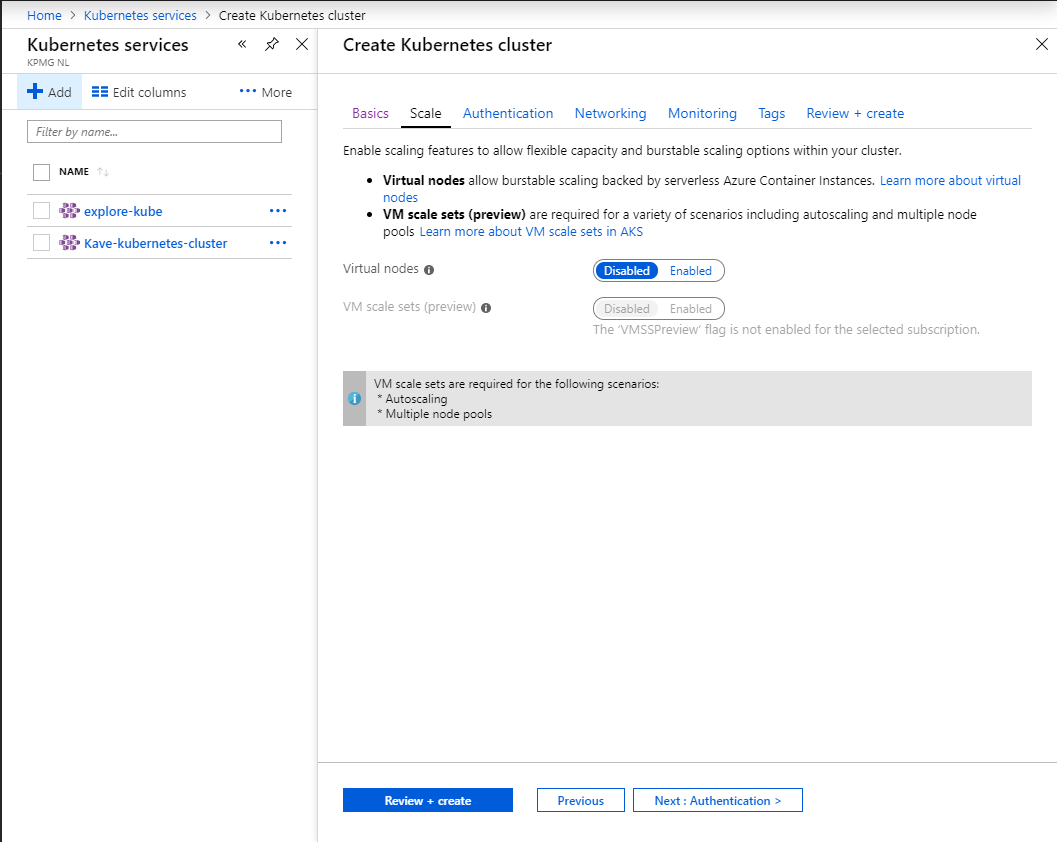
AKS virtual nodes mode with Spark did not work when I tested it
you will need an infra service principal (Active Directory - AD - application)
while not mandatory, the advanced network configuration is suggested
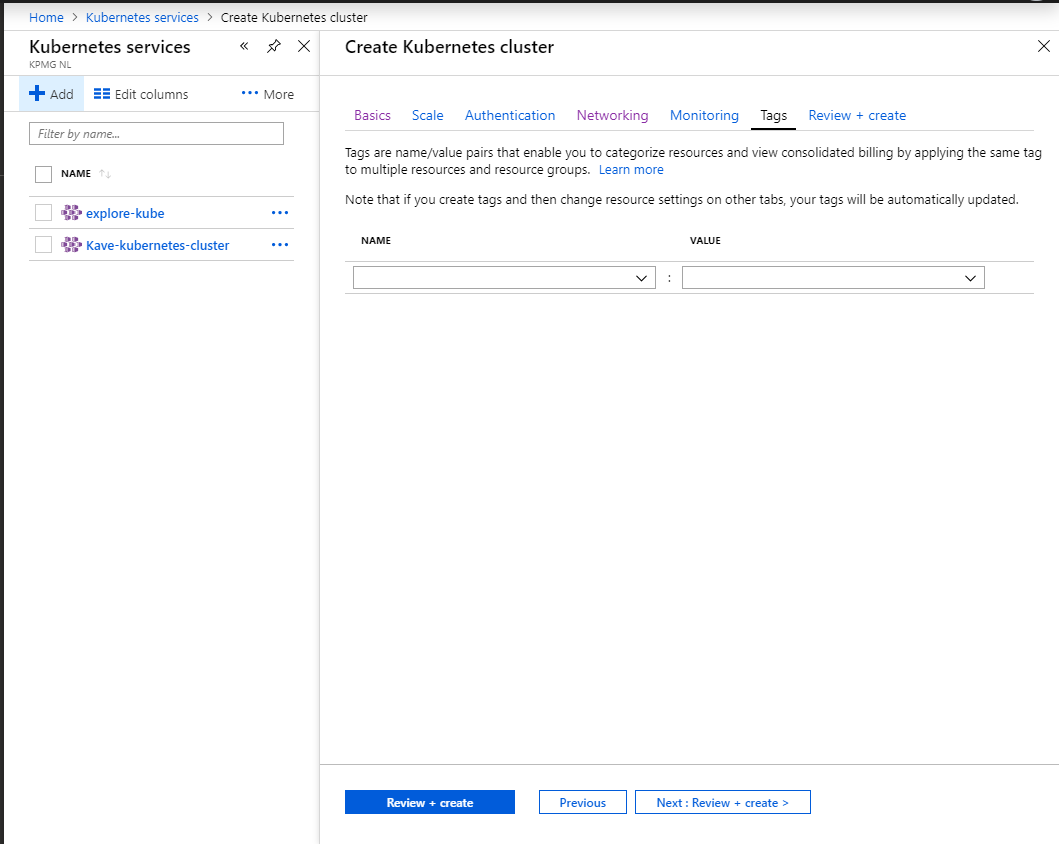
since AKS billing can become quite relevant, a good idea to tag the resource
You can quickly setup the cluster through the wizard:
Creation wizardScaleRBACNetworkTags
The infra AD app is the one the setup will use to talk to the Azure API to create the needed cluster resources, VMs for example: the k8s node will be actual virtual machines of the specified size.
Custom network control is always a good idea in Azure, with any kind of managed resource, think about an HDInsight cluster or a Databricks workbench - you may want to connect other resources directly, or have fine-grained control on the firewalling, all of this is not possible if the network is hidden, thus internally managed.
About tagging, this is also a good practice for any resource, especially if a subscription is in use by multiple teams or groups and you want to specify the cost centers with detail.
Finally on virtual nodes. The virtual nodes setup for AKS basically leverages Azure Container Instances to dynamically provide pods as needed. Theoretically this should be transparent to Spark itself, but when the job actually starts it fails immediately expecting some log file which is not there yet; it seems there is something going wrong in this unit.
Deployment automation
Just like any other Azure resource, we can manage its deployment with the Azure Resource Management (ARM) templates, see here for a full setup. You can readily setup the ARM-based deployment as an Azure DevOps release pipeline.
Access Control - Identity Access Management
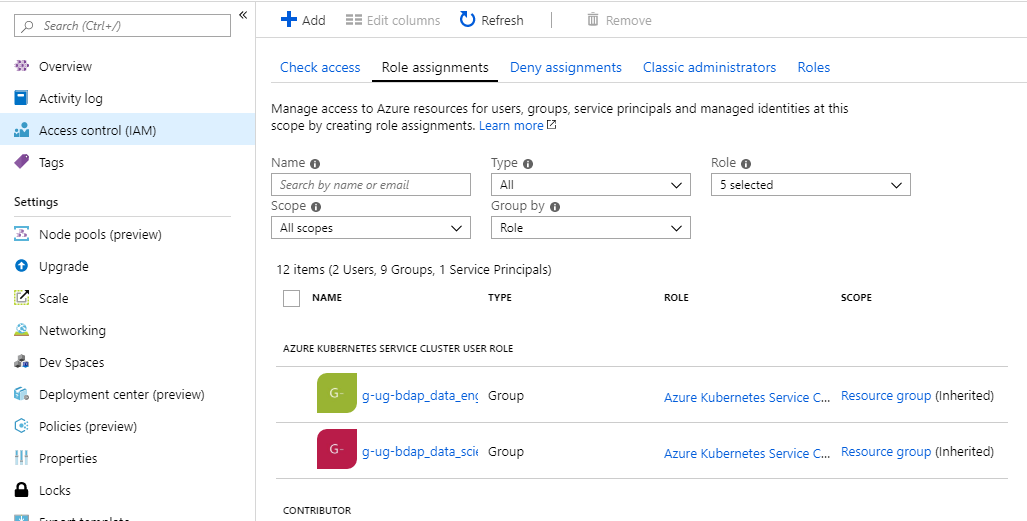
When setting up in RBAC mode as we do, it is very important to configure the accesses right from an AD perspective. Next to the usual Contributor and Owner roles, AKS has a specific Azure Kubernetes Service Cluster User Role: AD users and groups needing working access to the cluster need to get this role assigned; replace User with Admin and find the administrative role. While a reader role is also handy, contributor and higher roles shall be given only to those in charge of managing the solution, e.g. an infrastructure team.
Access Control (IAM)
Having the admin role assigned means that the user will be able to connect to the cluster with k8s admin privileges, more on this below.
Spark in k8s mode
Just like YARN mode uses YARN containers to provision the driver and executors of a Spark program, in Kubernetes mode pods will be used. The point is that in an RBAC setup Spark performs authenticated resource requests to the k8s API server: you are personally asking for two pods for your driver and executor. Anything applying to an RBACed solution also applies to our cluster, with two specific points:
we need to properly configure the agent which is performing API requests on our behalf
by introducing RBAC, specific per-user configuration can be implemented, for example resource quotas - you may ask at most say five pods, and consume no more than 250 MB memory and 1 CPU.
A Spark program becomes then specified as one container image, typically Docker, tobe spawned. In normal scenario’s you will not need a specific image for executors, the same image as for the driver will be used.
A two-step authentication
Let us assume we will be firing up our jobs with spark-submit. We will need to talk to the k8s API for resources in two phases:
from the terminal, asking to spawn a pod for the driver
from the driver, asking pods for executors
See here for all the relevant properties. The spark.kubernetes.authenticate props are those we want to look at. As you see we have the submission and driver sections, and multiple ways to authenticate, OAuth, certificate and service accounts . To complicate further, values may be passed as arguments or mounted as k8s secrets.
After some pondering and tests, we will go for the following:
providing the OAuth token to the Spark submitter, spark.kubernetes.authenticate.submission.oauthToken
setting up a service account for the driver, spark.kubernetes.authenticate.driver.serviceAccountName
At least now there are two mayor limitations in the Spark k8s mode for AKS:
we cannot use a service account for submission too (a service account is not a k8s service actually and it may not be accessed remotely))
certificate authentication is an option for admin mode only: when merging the configuration in non-admin, the certificate information is not sent back to the client (see below)
Getting the keys right
So in order to successfully launch a Spark job we need two pieces of information:
an OAuth key
a dedicated service account
OAuth key
We assume you have downloaded the Azure CLI tools as well as kubectl installed via az aks install-cli on Linux or OSX.
To get a cluster connection give the following:
az login
az account set --subscription "$SUBSCRIPTION"
az aks get-credentials -g $AKS_RESOURCE_GROUP -n $AKS_CLUSTER_NAME $ADMIN
after initializing the needed environment variables; optionally set ADMIN=--admin.
On a successful authentication the ~/.kube/config file will appear, containing the OAuth access token among others. Extract it with the following:
The TOKEN variable contains the value for the submission.oauthToken property above. In that configuration file you will also find the certificate setup, but only if in admin mode as said; certificate authentication is not supported by AKS anyway, see here.
k8s roles and accounts
To properly setup our personal Kubernetes environment in RBAC mode for Spark, we will need specific configuration. In particular:
proper roles to be able to create and monitor pods
a binding of such roles to our account
a service account
You can read more about this here and in the Spark documentation. For convenience here is a couple YAML files:
To kubectl apply those you will need to get a cluster shell as admin with the --admin switch above. Notice that these are templates: you will need to fill in the variables first, such as a username and your user Active Directory ID.
When done, you will have an own service account alias called spark, which will be the value for driver.serviceAccountName. While it is possible to have a cluster-wide service account for all users, it is suggested to keep them personal for a better separation of concerns in terms of security.
A complete Spark properties configuration
We are now ready to create the spark.properties file we will provide to spark-submit. It will look like:
where you will replace <TOKEN> with the value of the $TOKEN variable above, and <CLUSTER> is the k8s://https:// address of your AKS cluster (copy that from the portal). If you will launch the Spark submit from inside the cluster, say for example on a test environment running inside a pod, you may just use the local reference k8s://https://kubernetes.default.svc:443.
A few comments:
the number of instances must be satisfied with your quota if set: if you ask for three executors but only have one pod left for example, that one will go to the driver and your job will keep hanging until you free up other pods, by killing existing jobs for example
a specfied image will be always pulled: this avoids situations where the image you are firing gets stale, and it is very little time overhead for nontrivial jobs anyways
the Python version should match the version of your driver image program; for PySpark on k8s, version 3 only should be used
tokens will expire after a while, with the Azure AD default policies it is one hour, but this file needs to be kept secret at all times, keep it in your home but do not share it
token expiration also means that you will have to update the token in the configuration every hour: to get a new token just repeat the credentials download again, or perform any kubectl command
Test program
We will use Docker of course, and before we start, make sure you have a Docker repo up and running. A very easy option is just to create an Azure Container Registry in the same resource group as the cluster.
Let us try out a very simple PySpark program just to make sure everything is fine. Find an example program here.
As you can see this is based on a spark-py:v2.4.0 image: how do we make that?
Base PySpark image
How to build the PySpark spark-py container image:
download the Spark source code from the official website, e.g. spark-2.4.0.tgz
The Hadoop version is of particular relevance because we need to have a version compatible with the specific Azure jars - not shipped with Spark itself - if we want to have Spark jobs talking to the Azure DataLake Storage for example.
Once a Hadoop version is fixed, getting the latest greatest for those jars should work.
Launching the Spark jobs
You should have pushed both the base and test PySpark images to the repository now. Properties file is also ready. That means we are ready to launch the job! Give:
where $NAMESPACE points to your personal k8s namespace created in the YAMLs above, the image is the test Spark program and the Python program is an actual path in the image itself. It goes without saying that you should have Spark 2.4.0 properly installed locally.
Follow through the logs now; once the job successfully starts, a kubectl get pods in your namespace will show one driver pod and a number of executor pods.
Congratulations, Spark on Kubernetes mission accomplished!
Final considerations
After working with this setup for a while, it seems to me that Spark is not really a first-class citizen on Azure Kubernetes Services, even if there are quite a few Azure blogs covering the basics.
All of the above is fully documented in the respective projects only, and that is why it feels perhaps a little cumbersome - a full-stack walkthrough was not there when we first digged into this (well now there is this blog!).
For higher freedom while keeping the configuration headache at a minimum, deploying Spark on Kubernetes feels easier on Google. But the real extra point Azure gets here is the seamless and advanced Active Directory configuration, guaranteeing control on the access and a clean mapping between authentication, resource management and control.
Back in the old days, where terminals were dummy and operators were not so nice to users, X was not a very popular generation of Macintosh operating systems, but rather a windowing system for UNIX and friends.
Without getting into troublesome detail, the windowing system cares for basic operativity in a GUI environment, things like drawing and moving program windows, handling the mouse and keyboard input. On top of it you have much more, the look and feel for example - but that is a matter for the window managers and desktop environments (KDE, Gnome etc).
The X Window System has stopped at version 11 in 1987, which would sound disappointing to the agile and fast releaser in you - but well if you get something very right, there is no need to change it… right?
11 is actually the version of the reference protocol and it is pretty advanced. Among other things, it allows for a decoupling between the component providing the windowing service - the X server - and the programs asking for windows to be drawn and clicks to be fired - the client applications. Furthermore, X uses TCP networking.
Do you see it already? Nothing prevents you from running some graphical program in the cloud but “use” it in the comfort of your little laptop. We don’t want to go that far maybe but let’s see how we can do something useful with the so called X redirection.
Why do you even want to do this
First of all, X redirection is so Linuxey and so ninetys, thus cool in its own. That kind of trick you learned at the local Linux Users Group as a kid, or used to impress your Windows-only peers at school - again, past times in this world of Linux-in-Windows and Docker.
But actually, there are a handful of cases where it is really useful. For example: you have a Linux box but the box is actually very old, so old and unstable that even running a low-carb desktop environment as XFCE is challenging. As the next stop would be to run a bare X itself - not very eyecandish and useful - you think of the following: why not borrowing some power from a new shiny Mac? Don’t panic if you don’t have such exotic needs - I had and it makes a good example for this post.
From Linux to macOs
Our dear osx laptop is a unix-like system and you know it. Thing is, its window server, represented by the obscure WindowServer process, does not speak X11 - and an X11 implementation is not included by default either.
No worries: you can install XQuartz - which is an independent project supported by them. So basically what we are doing is running our own X11 server on the powerful mac, and have the client applications on our Linux box use it as server: things will run on Linux but windows will pop up on the mac - magic.
Disclaimer: such a simple setup is OK for home but it should not be intended for real and secure use. In particular, the session is not encrypted, which means that traffic between the server and the client - keystrokes too - may be sniffed; for the un*x lamer in you, check this. The most common way to have such traffic encrypted is tunnel it via SSH.
Steps
We assume that the laptop and the box see each other eg they sit on the same home network.
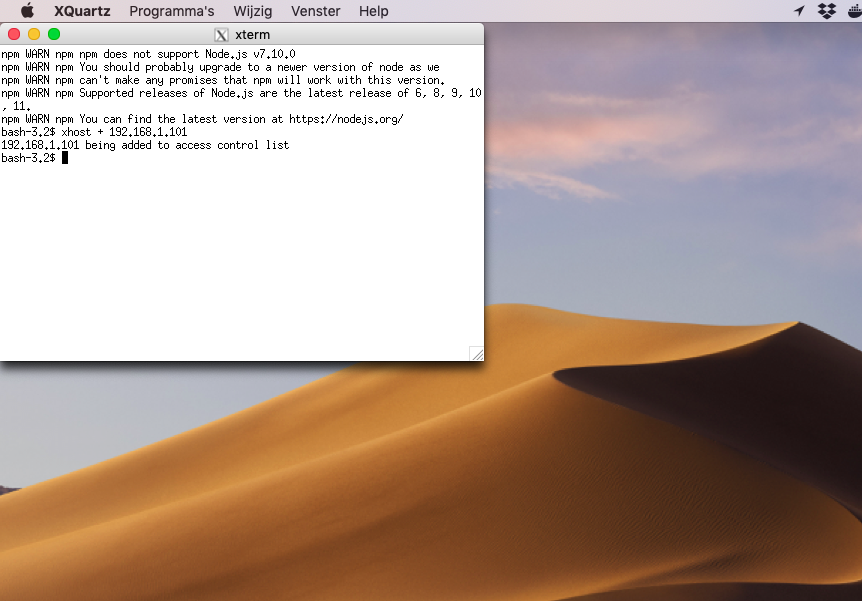
When you open XQuartz you will not see anything but the server will start.
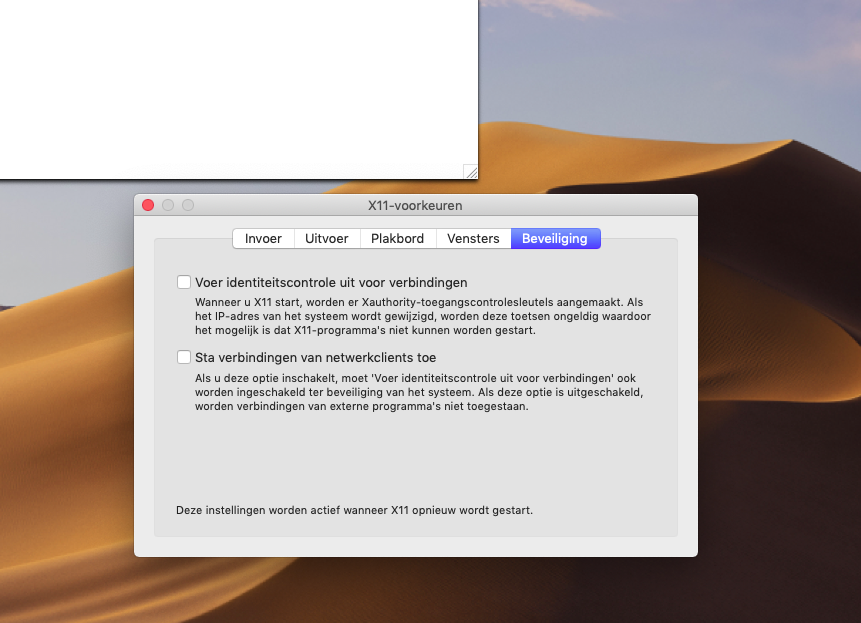
By default, at least in recent XQuartz versions, over-the-wire TCP will be disabled; to turn it on:
so we are actually disabling the non-listening (you can actually set this in the program configuration too); check it is listening with:
netstat -na | grep 6000
Then, we want to allow incoming traffic from a specific IP only; open a Terminal session, this time from XQuartz itself, and give:
xhost + 192.168.1.101
where 192.. is the IP of the Linux box. If you omit the argument address or hostname, any client will be allowed; using a minus sign removes a specific client or blocks all.
The host-based access is to be frowned upon because it not that secure, for example the request might be coming from an accepted router but be originating on some unwanted computer behind it. Completely fine for our test but keep in mind that a more secure approach - more secure in 80’s terms at least - is the cookie-based access via the .Xauthority file: for a program to be accepted by the remote server this file must be dropped in the user home of the user starting the program. How you upload it that is your business, for example scp.
On the Linux box, we want to configure the server display properly. Give:
export DISPLAY=192.168.1.103:0
where this 192.. is the mac IP instead (we are connecting to the first and only display server).
X-based applications on your Linux box, such as some new shiny release of XBill will now hook up to the configured remote server, so you can use them on the mac. To easily test you can try either:
xeyesxeyes -display 192.168.1.103:0
I find it handy to launch programs in the background:
xeyes&
Be aware that if the connection drops most probably the session will die too, leaving a behaded program. Also if the network changes things break too. The legend goes that only a very rare binary of emacs compiled with X support by Richard Stallman himself, on gcc v0.5 has the ability to switch around sessions.
xlogo is another superb application I challenge you to test.
Anyways, congratulations, it is 1988 again!
Wasn’t that fun?
It never ceases to amaze how computers and all that go extremely fast, still things conceived and written so far away still work with little to no changes - by the way, do you know how old is ping?
In theory, it is also possible to X-stream videos and all that, but it will most probably hiccup and freeze.
Over the last couple of years more and more organizations want to have processes which act immediately upon events as they come. This is definitely a big trend, and it usually goes under the umbrella term streaming applications, but the actual keyword, and proper programming paradigm, is stream processing.
Streaming applications as regular computer programs, well we need to test them somehow, how about this? For a stateless streaming application, one which does not retain any memory of what it sees, things are rather simple. Could we say the same about applications which are stateful instead, those which compute some state in terms of some function of what they see? In this post we give a real life example and show that of course it can be done, but it is also fun!
There will be no theoretical preamble to this discussion; first of all because I do not know anything relevant in this sense, but also because this wants to be a quick peek. You are very welcome to show pointers on this discussion: I have not managed to find anything very interesting myself, but I am pretty sure there is. As usual: build on what other people have built!
Frameworks and libraries
There are a number of solutions to implement streaming pipelines. In our walkthrough we present the concepts with Apache Spark in Scala.
In particular, we refer to the classic Spark Streaming API, so discretized streams, just to be clear. The new way of doing streams in Spark is using structured streaming. In this production exercise we had to choose for the former as the latter does not provide everything, e.g. stream2stream joins.
Furthermore, we use Holden Karau’s spark-testing-base. Holden made a great job in fitting a nice integration on top of ScalaTest, exposing enough stuff for rather advanced scenarios. An associated project, also fundamental in the development, is Scalactic.
The issue at hand
In this exercise our task is to reimplement a legacy processing pipeline, and the behavior is an invariant. This means that basically the new implementation must behave exactly as the old one, modulo some numerical tolerance because the technologies, and therefore data type implementations, in use are completely different.
The most relevant point from this is then: we have data to test against! In particular, we are able to provide an input for the streaming data and an output to be produced by the processor having seen such streaming input.
Let us build up some notation to better address this and get to understand what we are exactly talking about, before even stepping into the code. Again bear with me if this is not that orthodox - please point out relevant theory in case.
We can model a stream as an infinite set:
at every instant a new event comes in. The state of the stream is represented by some set and it is defined, at every instant, as the result of applying some function to the new incoming event building up on what we have already; the state of the application may be conveniently modeled as the sequence:
where some initial state is given and the generic state at time is given by:
to conveniently look at the current state only, instead of carrying all the events from the past. This is basically an order-one recurrence - starting from a predefined state, at every tick we are perfectly ready to compute the new state.
But what if we needed some more state to be built up, before we can be able to produce the current tick? Taking a step back, in this simple writing if you unfold the recurrence the state at time , so , is built as a function of the initial state and the events so far:
and what if this is not defined? Coming back to planet earth: have we seen enough events in the stream for the state to be defined? Say in the application we are asked: for a new car, determine the the driver profile (occasional, commuter, taxi driver etc) after no less than eight days of usage. Before eight days we could not really dare to say anything, the state is undefined!
Now in our testing scenario we are given some stream and the sequence of state sets our application is expected to emit seeing that as an input. These two sequences are extracts of a run of the original application: think that the old application is running and at some point the input messages, and the state produced for those, are recorded.
Again, assume this eight-day horizon for the application. The very first eight shots of our stateful application, so the set will be undefined. To check whether our new implementation is correct or not, we have to evaluate the equality:
for every time . Until this equality is not well defined: while the state recorded on the old app is legit, what we are producing on the side of the new app is not defined, because this is a cold start and we are missing whatever the old app had before. The eight time ticks is actually analogous to what in other areas is referred to as burn-in period.
In a nutshell, in the codeful part of this blog we show how to implement such scenarios in an elegant way in Spark streaming. How do we go about asking the testing framework to discard a prefix, and live happily thereafter?
Setting up
Let us continue with the analogy of the car application: our streaming application maintains, for every car we monitor, a profile of its driver. The right profile is inferred from collecting some instant info sent out from the car, let’s just say the GPS position and speed.
In real life these events are coming from some source, these days Kafka and Spark make a great duo, but this is not relevant here. The profile is simply:
sealedtraitProfilecaseobjectCommuterextendsProfilecaseobjectRacerextendsProfilecaseobjectUnknownextendsProfilecaseclassDriverState(chronology:SortedMap[Instant, InstantInfo],avgSpeed:Double,profile:Profile){//we will fill this in below }
To write our stateful application, we will use the mapWithState method. See some (outdated) info here and an excellent discussion here. About this API, let us say that it is the successor of the epic updateStateByKey; the interface is a little more complicated but it does not grow linearly in the number of stream events like its predecessor did.
A streaming application
The class DriverState represents the current state for a specific car / driver (let’s use these terms interchangeably); all together, they make up the big at the current time. Every time we see a new car beacon come in, there are two cases:
the car is seen for the first time, it is not known to the system yet: some initial state will be defined for it, collecting the very first measurement
the car is known and a state for it can be found; this state is updated and, if we have seen enough measurements, then we may say something about the driver profile
Let us model this state as a self-contained assignment-free class, functional style:
nevermind the business logic, that is not important. So, get a new measurement in, add it to the history for the car as the record of the hour behavior, check if the state may be updated. What is really crucial though is that the behavior is forgetful, what do we mean?
The current state is defined by looking at a finite horizon in the past. This is the property of applications which can catch up - real life processes are always time-limited, and a streaming process even more because otherwise the state would grow indefinitely. This is implemented by dropping the oldest record, every time, after we have read some (how many is that horizon variable).
The createStream method is our entry point: it accepts the incoming stream of messages and creates a global state . There are three operations:
define a method to update the state; this is our function
application: compute the sigma function on the states
emission: return the projection of the State on a particular car (and return this)
There are many other functionalities Spark supports here, for example setting a timeout after which long-not-seen entries are discarded, choosing an initial state . Spark requires the input stream to be key-paired in order to let us define a state, a state instance is always linked to a key entry.
The sigma function has some noise because of the Options all around, but what it does is implementing the two cases newcar vs oldcar explained above; for every encoming car in the stream, a state is created or updated.
We can easily create a main to drop an input and output file for us to test. Even better, we will make a self-contained unit test taking care of creating the needed test data and try things out - smooth!
Are we there yet?
The test suite does a few things for us:
generates a number of random records for the stream
computes a full test state and serializes it
defines a function to test the performance of the “new” streamer against the data of the full test state, ideally produced by some “old” implementation
properly configures the testing framework
executes the run with a specified burn-in, which is creating a and testing it with the equality
If we ask our new stream processor to calculate a state from the input file, the result would be completely different from the test state, until some time is hit. Before this point, an equality function is not defined - this is until we stay in the famous initial sequence - we have to discard this.
We will have to let two streams be compared in Spark, the old and new one, arguments to the equality function. For the comparison to yield a true, which means a green test, we need to know where to cut, somehow. This cut point is where our new application has caught up so to say - it is aligned because the past state it is not presented with has no more effect, the window horizon has elapsed and we have discarded what we had to discard.
Usually, and especially in this artificial reproduction, this is not exactly the length of the window, in our case a few days, but at some point we need to stop discarding and sync up.
The equality function is:
implicitdefdriverStatesEq(burnInDate:Instant=Instant.EPOCH):Equality[DriverState]=newEquality[DriverState]{privatevaltolerance=0.0005fdefareEqual(a:DriverState,b:Any):Boolean=(a,b)match{case(_,ds:DriverState)ifds.chronology.isEmpty=>println("Skipping comparison (stream record with empty chronology)")truecase(_,ds:DriverState)ifds.chronology.last._1isBeforeburnInDate=>println("Skipping comparison (burn-in)")truecase(DriverState(chronologyA,avgSpeedA,profileA),DriverState(chronologyB,avgSpeedB,profileB))=>println("Comparing!")(avgSpeedA===avgSpeedB+-tolerance)&&profileA==profileBcase_=>false}}
(this actually wrapped with some boilerplate in the code, but nevermind). The trick to the whole idea is the first case: if the syncing time has not come yet, we do not want to compare the values, just confirm with a true. It is now time to reap we sow and implement a nice demo in the form of a unit test.
Putting it all together
We are going to write a test now; to be tediously formal, this is a functional test - the pipeline is a program of its own and we are testing part of it (in our case it is just one part so ok). A hint at how powerful things can get is in the code and it goes by the name of function composition!
The nude equality function is not enough the make things work in the Spark testing framework. Among other things we need the following override:
overridedefverifyOutput[V:ClassTag](output:Seq[Seq[V]],expectedOutput:Seq[Seq[V]],ordered:Boolean)(implicitequality:Equality[V]):Unit={if(ordered){valx=output.flattenvaly=expectedOutput.flattenif(x.size!=y.size){println(s"Sizes do not match! ${x.size}, ${y.size}, auto-resizing")valresizedY=y.drop(y.size-x.size)println(s"Sizes are now: ${x.size}, ${resizedY.size}")xzipresizedYforeach{case(a,b)=>assert(b===a)}}}elsethrownewIllegalArgumentException("Only list-based comparison is supported for this override")}
See the code for the details, but the framework tries to model the batching of a Spark application, which is something we do not need here, and the output sizes and forms are not a function of the inputs alone - we need to reshape the lists a little.
As hinted above, we will test functional style of course:
this is the streaming operation. In real life a pipeline is composed by multiple of those, but the cool thing is that you can mix and match for tests the whole flow if you use them as functions!
so we are instantiating the equality with a desired burn-in and fire off the operation: for a specified input we expect a given output in memory, and this state must be equal to the serialized state we read back, which was created in the first (virtual) test.
It is definitely a good idea to fiddle around with the parameters, such as the number of initial messages and the burn-in date, to even break the code and get a feeling of what is going on.
Time to sleep
In this blog we have looked at an interesting scenario of stateful streams testing, with some - vague pseudo-math around it to get things firm. Not really sure this is like an everyday thing, but it is for sure very cool that I have implemented this on a real project, showing a guarantee that the new streaming implementation is consistent with the legacy solution.
Find the full code here, together with the other posts.
I would be very glad to welcome feedback and improvements, and if you have some question very glad to answer!
PS2 memcard data on your PC, can you work with that?
I have my old PS2 memcards and I want to play on the PCSX2 emu with the old savegames, how do I do that?
The right devices and system
You are a hardcore PlayStation 2 player (ok even PS1 maybe) and you still have those old and rare Sony memory cards around (ok yes maybe cheap chinese replicas too). And they are loaded with savegames. You want those to come back to life, bring the clock back to the late 2000’s and start that GTA Vice City Stories with close-to-100% percentage completion. Yes, you can. And it is not that crazy difficult, either.
First of all, how do we hook up the memory card to the computer? You need the adapter. Right, not just “some adapter”. Buy on eBay an original Sony memcard adapter. I stress this because, for personal experience corroborated by old forum threads cheap chinese replicas just won’t work. Apparently the chipset around is missing some crypto detail and the data transfer fails. C hackers from the forum tried hard, unless you are the new Stallman I suggest you to buy the real one. By the way it looks like this, don’t get fooled on Tha Intahnet.
Also, this has been tried on Linux even if the util we are going to use is for Windows too. Nevertheless you might have to get yourself the libusb driver.
t00Lz
Download the ps3mca-tool. This is the memory card adaptor tool, created by ancient hackers. We will copy over the contents of the memcard as a binary image:
./ps3mca-tool -img memcard.img
This is just a binary data image, simple and plain.
Now use ecc_check to add the ECC info to your dump:
ecc_check.exe memcard.img memcard.ps2
Basically the ps2 format is the binary dump with some error-correcting codes. Aha, we are clearly using Wine here.
h3mu
Install PCSX2 and configure the BIOS. You can simply install it from the software center (and you should). Unless your computer is blazing fast and new, as in OpenGL 3+, don’t even bother. Go get a powerful box and come back to this later, we’ll wait for you.
Ok. Configure the BIOS now. I am not hosting the BIOS file “because w4r3z” but you can find many on eMule, or well maybe you have flashed yours already. In the CDVD menu select “No disc”, unless you have one, ie you didn’t listen when I told you to go get a real computer.
Drop the ps2 files into the memcards folder and mount them in from the PCSX2 configuration.
Use this PCSX2-modded uLaunchELF and boot your emu - there is no real difference between the regular and compressed binary. Enter the first two folders, these are the memcards, make sure your data is there.
Load the iso and go! The memory card will be recognized and usually the latest savegame start.
Troubleshooting
If it’s like no memory card is detected in the game, it could be the region, savegame’s are also region bounded, like the optica. But fixing this is pretty easy. If everything is working fine already, skip this section.
Download myMC and a hex editor. Open mymc-gui.exe and export the savegame to convert. Download a savegame in the target region from GameFAQs or so. So say your current savegame is PAL but the ISO of the game is NTSC, you want to convert the PAL save to NTSC then, so download a US save from the website.
Backup your PCSX2 memcards directory, that is just duplicate it. Now in myMC select this memcards folder and the desired memcard, then select the savegame to modify and export it. Open the exported .psu file with the hex editor, and open the one by GameFAQs too. Replace any BESLES-XXXXX occurrence in the first, so our savegame to convert, with the BESLUS-YYYYY you find in the second - or vice versa; it could be many instances or just one.
Save the modified file and rename it, so SLES-XXXXX to SLUS-YYYYY. Finally, import this new .psu into the memcard with myMC. You can keep the old savegame if you have enough space of course.
Play on!
Now you are all set up to bring those old achievements back to life, congrats! Unless your computer has rockstar specs, you may experience lag - no matter that PAL vs NTSC framerate thing. PCSX2 does help in this sense, set the speed hacks to say level four in the configuration. In GTA:VCS this sensibly improved the playability, from map and radio lag to fluid, or better regular, game dynamics.
About where to find games, see question for the BIOS above, but you can use your old PS2 DVDs if you still have them, or turn to eMule for some fresh ISOs.
I have had the chance to play a little with Gearpump, an Akka-based data processing framework. A few very interesting features are:
stream processing: simply define event sources and sinks, together with all that should happen in between, with data processed in a standard streaming fashion
clean scaling: the architecture could be seen as Spark-like but the roles and control flows are clearly defined as we talk about actors here
easy job composition: jobs are composed with a flow-based DSL, so if you are used to working with Akka streams for example it is all really easy
modular connectors: a few source and sink connectors are provided already, and you are free to create custom ones targeting your Hadoop beast of choice
hassle-free scaling: define your actor workers and configure how many of them you need
What we are going to do
Let us go through a full example to see how things actually work, together with the deployment of a Gearpump program on YARN. We will prepare a modified version of the wordcount example found
in the documentation. We will:
read the text from a Kafka queue - this is our source
Deploying the Gearpump YARN infrastructure and setting up our data source are part of the tutorial too.
Source and sink setup
Our data source will be a Kafka topic containing the text to process and we will use an HBase table collecting the counts. We assume to work on a standard Cloudera
cluster, not that it really matters, any distribution of your choice will do.
so we pour the textfile into a new topic loremipsum; --new-producer uses the new Kafka producer implementation - without it the command failed, at least on my cluster - I have not investigated why.
Notice that in Kafka topics may always be created on-the-fly, ie as soon as the first message is posted. In that case they are created with default cluster settings, eg only one partition. To create the topic beforehand with proper partitioning and redundancy settings:
then you can use the console producer to pour the data.
Finally we pour the data in HBase. Surprisingly, Gearump does not take care of creating the table for us if it does not exist, at least on the version I tested. In general, use the HBase shell:
$hbase shell>create randomipsum','counts'
this creates a new table in the default namespace.
This expression will be familiar if you worked with Akka streams or any other flow-oriented framework, what we actually build is a graph, an execution graph:
pick up the data from Kafka
split it
route it to the summers according to a partitioning scheme
store the result in HBase
Let’s see how we build every computing entity.
With a little taste for abstraction, we define a provider trait for our Kafka processor needs:
A few bits of Kafka-related configuration of course, coming from a configuration provider, and the creation of a Gearpump Kafka source. This is more Scala than anything, but notice how we must require for an Akka actor system in the contract.
What we define here is an actor task, whose instances are managed by the Executor Application Actor, the workhorse, which is a child of the Worker actor for that cluster node. Here sits the key to flexible parallelism and thus performance - one may spin up as many task actor instances as needed. You can read about Gearpump internals here.
See how the Message is actually containing the data, and yes it is really awful to beg instanceOf just to get a mere array of bytes - future releases may have considered powerful abstractions via scalisms like macros.
This computation is started once and continued forever - we just keep waiting for new messages to come and process them; this typical actor design pattern is explained here.
The task itself is nothing new, just remember we use a foreach since we have a void return, given that we are firing off the message chunk.
The next step is to route the text splits to the Applications for the sum. The easiest way is to hash-partition, on the usual uniformity assumption the workload will be split evenly.
And now the sum - notice that once you break out of the mapreduce paradigm you can just aggregate as much as you like, a Task can do anything. But unless the operations are really easy and fit into the listisms of Scala the best thing it to reason in terms of one task equals one transformation/operation:
Every string we get is a word. We keep an internal state for the counts, the map object. We increase the counter for the word, which will be non-zero if the word has been seen before. The outbound message has a rather complex and undocumented structure, it contains the key, family, column name and value.
How are the two actor types made known to Gearpump? Simple with:
We can see the Kerberos configuration, asking to read the two variables as a string and as a binary file respectively. The ZooKeeper configuration properties are mandatory, you might get funky errors without them.
We abstract from a particular Hadoop distribution, but a common important point is to support Kerberos. In this respect, Gearpump comes with integrated Kerberos configuration, which is cool and makes a crucial checkbox for production.
First, download the Gearpump precompiled package here and upload it to a suitable HDFS location, eg /usr/lib or your home.
Locally, unzip this package and copy the contents of the Hadoop configuration directory /etc/hadoop into the conf subdirectory.
Now launch the Gearpump cluster YARN application, eg: bin/yarnclient launch -packa
ge /user/rvvincelli/gearpump-2.11-0.7.5.zip; your application should appear under
the Applications tab for YARN; if not, investigate the logs.
and if you see Submit application succeed in the output then everything went fine :)
Make sure the application is running by connecting to the Gearpump webapp (see here) - you find the link in the container logs of the Gearpump instance on the Y
arn Resource Manager webapp.
Once you log in click on the Details button for your application - if it is not enabled then the application has already terminated time ago. In the Overview tab click on Log dir. and move to this path on the box where the appmaster actor is running - you see this in the Actor Path entry.
To make sure the data is there fire up an HBase shell and scan the table:


 is given and the generic state at time
  is given by:
 from the past. This is basically an order-one recurrence - starting from a predefined state, at every tick we are perfectly ready to compute the new state.
 , is built as a function of the initial state and the events so far:
 and the sequence of state sets
  our application is expected to emit seeing that as an input. These two sequences are extracts of a run of the original application: think that the old application is running and at some point the input messages, and the state produced for those, are recorded.
 will be undefined. To check whether our new implementation is correct or not, we have to evaluate the equality:
 this equality is not well defined: while the state recorded on the old app is legit, what we are producing on the side of the new app is not defined, because this is a cold start and we are missing whatever the old app had before. The eight time ticks is actually analogous to what in other areas is referred to as burn-in period.
 and creates a global state
  . There are three operations:
 function
 and serializes it